 mat.services
diy code hosting with gitea and fly.io.
Setting the Scene
Inspired by the Give Up Github campaign, I recently decided I wanted to spin up my own instance of Gitea. There are free (as in beer), free (as in freedom), public instances of Gitea and other FOSS-leaning code forges, but self-hosted Gitea struck me as a nice way to take even a bit more ownership over my own code.
I maintain a small PC running in my home as a server for a few services running via Proxmox, but I am really dissatisfied with my workflows for managing that box lately (picture SSHing into LXC containers and manually editing systemd configurations... yuck). I recently read a couple of different articles singing the praises of Fly.io, a platform as a service (PaaS) that replicates most of the good parts of the classic Heroku developer experience. Further enticed by their ample free tier, I took the plunge and created a Fly.io account.
Getting Started
First things first: in order to interact with Fly.io, we primarily use the flyctl command line tool. It's available from a variety of sources:
# Nix
nix-shell --packages flyctl
nix-env --install --attr nixpkgs.flyctl

# macOS
brew install flyctl

# Linux + non-Homebrew users
curl -L https://fly.io/install.sh | sh

# Windows users
iwr https://fly.io/install.ps1 -useb | iex
flyctl can handle signing up for a Fly.io account if you haven't done that, otherwise you can use it to sign in:
# Opens your browser to set up an account
# This step requires a credit card, in the event you exceed the free tier limits
# See https://fly.io/docs/about/pricing/ for details
flyctl auth signup

# Opens your browser to sign in
flyctl auth login
Configuring Apps with flyctl
In order to avoid even the appearance of disorganization, we'll start off with a git repository for tracking our Fly.io configurations:
mkdir fly-apps; cd fly-apps
git init
mkdir gitea; cd gitea
Next up, we create our app configuration and register it with Fly.io. flyctl takes care of this for us in a single command, flyctl launch. The command will prompt you interactively for some input, but here we'll just pass some flags directly:
flyctl launch \
  # use the official Gitea docker image \
  --image gitea/gitea:latest \
  # give our instance a unique name, this will be used to generate a development hostname like gitea-mat-services.fly.dev \
  --name gitea-mat-services \
  # region where the app runs, don't supply this option if you want to interactively choose a region \
  --region ewr \
  # don't immediately deploy, we need to edit our fly.toml first \
  --no-deploy

# don't forget to commit!
git add fly.toml
git commit -m "Add default generated configuration"
We will also need a volume for persisting git repositories:
# Create a 3GB volume
# Note: this will consume your entire free tier allotment for volume storage!
flyctl volumes create gitea_data
# Alternatively, create a smaller volume
flyctl volumes create gitea_data --size 1
Now our app is ready to deploy, but first we're going to make some changes to the fly.toml configuration that was generated for us. Gitea has their own post on Fly.io which includes a sample configuration, and we can reference that to end up with something like the following:
<snip>

[env]
+   GITEA____APP_NAME = "git.mat.services: Gitea for me"
+   GITEA__database__DB_TYPE = "sqlite3"
+   GITEA__database__PATH = "/data/gitea/gitea.db"
+   GITEA__server__DOMAIN = "gitea-on-fly.fly.dev"
+   GITEA__server__SSH_DOMAIN = "gitea-on-fly.fly.dev"
+   GITEA__server__ROOT_URL = "https://gitea-on-fly.fly.dev"
+   GITEA__security__INSTALL_LOCK = "true" # Don't show installer
+   # GITEA__service__DISABLE_REGISTRATION = "true" # TODO: uncomment once you have created your first user

+ [mounts]
+   destination = "/data"
+   source = "gitea_data"

<snip>

+ # ssh traffic
+ [[services]]
+   internal_port = 22
+   protocol = "tcp"
+   [[services.ports]]
+     port = 22

[[services]]
<snip>
-   internal_port = 8080
+   internal_port = 3000
<snip>
Don't forget to save your work!
git add fly.toml
git commit -m "Add Gitea specific configuration"
Liftoff!
The stars are aligned. The witching hour has arrived. Let's deploy our app:
flyctl deploy
After flyctl does its thing, your Gitea instance should be up and running at https://<your-app-name>.fly.dev! For the extremely lazy, flyctl will do the work for you:
flyctl open
Now you can register your account! If you want to keep your Gitea instance private, uncomment the last line in the env section and rerun flyctl deploy after registering.
Bonus Round: Configuring Your Custom Domain with Fly.io
Some, like myself, will not be satisfied accessing their Gitea instances with a .fly.dev URL. Thankfully, Fly.io makes it a breeze to configure a secure custom domain with the help of LetsEncrypt.
Fly.io and flyctl seem to offer tooling for managing your domains and DNS records entirely within the Fly.io system, but I personally didn't explore this route, as my own domains and DNS records are managed elsewhere. Whatever you use to manage your own domains and DNS, you will need to create two records for your domain name corresponding with the IPv4 and IPv6 addresses of the application:
flyctl ips list
TYPE ADDRESS             REGION CREATED AT
v4   1.2.3.4             global 2022-07-03T04:39:18Z
v6   dead:beef:1::a:a    global 2022-07-03T04:39:19Z
Create an A record for the v4 address, and an AAAA record for the v6 address. With those records in place, flyctl can automatically perform the necessary setup with LetsEncrypt to secure your domain:
flyctl certs add git.mat.services
flyctl open
Now it's time to revel in your new code hosting powers.
The First Push (or, 256MB just isn't enough sometimes)
With everything now set up, let's go ahead and kick the tires on our new Gitea installation. We can push our fly-apps repository to Gitea as a test. Create a new blank repository on Gitea with an appropriate name, then add that as a remote for your local repo:
git remote add origin git@git.mat.services:mat/fly-apps.git
And now it's as easy as one simple command!
git push --set-upstream origin main
Enumerating objects: 3, done.
Counting objects: 100% (3/3), done.
Writing objects: 100% (3/3), 195 bytes | 195.00 KiB/s, done.
Total 3 (delta 0), reused 0 (delta 0), pack-reused 0
remote:
remote: Gitea: Internal Server Error
Gitea: Internal error
To git.mat.services:mat/fly-apps.git
 ! [remote rejected] main -> main (pre-receive hook declined)
error: failed to push some refs to 'git.mat.services:mat/fly-apps.git'
Uh. Hm. I just got an email saying a Fly.io instance ran out of memory and crashed. Let's peek at our Fly.io dashboards:
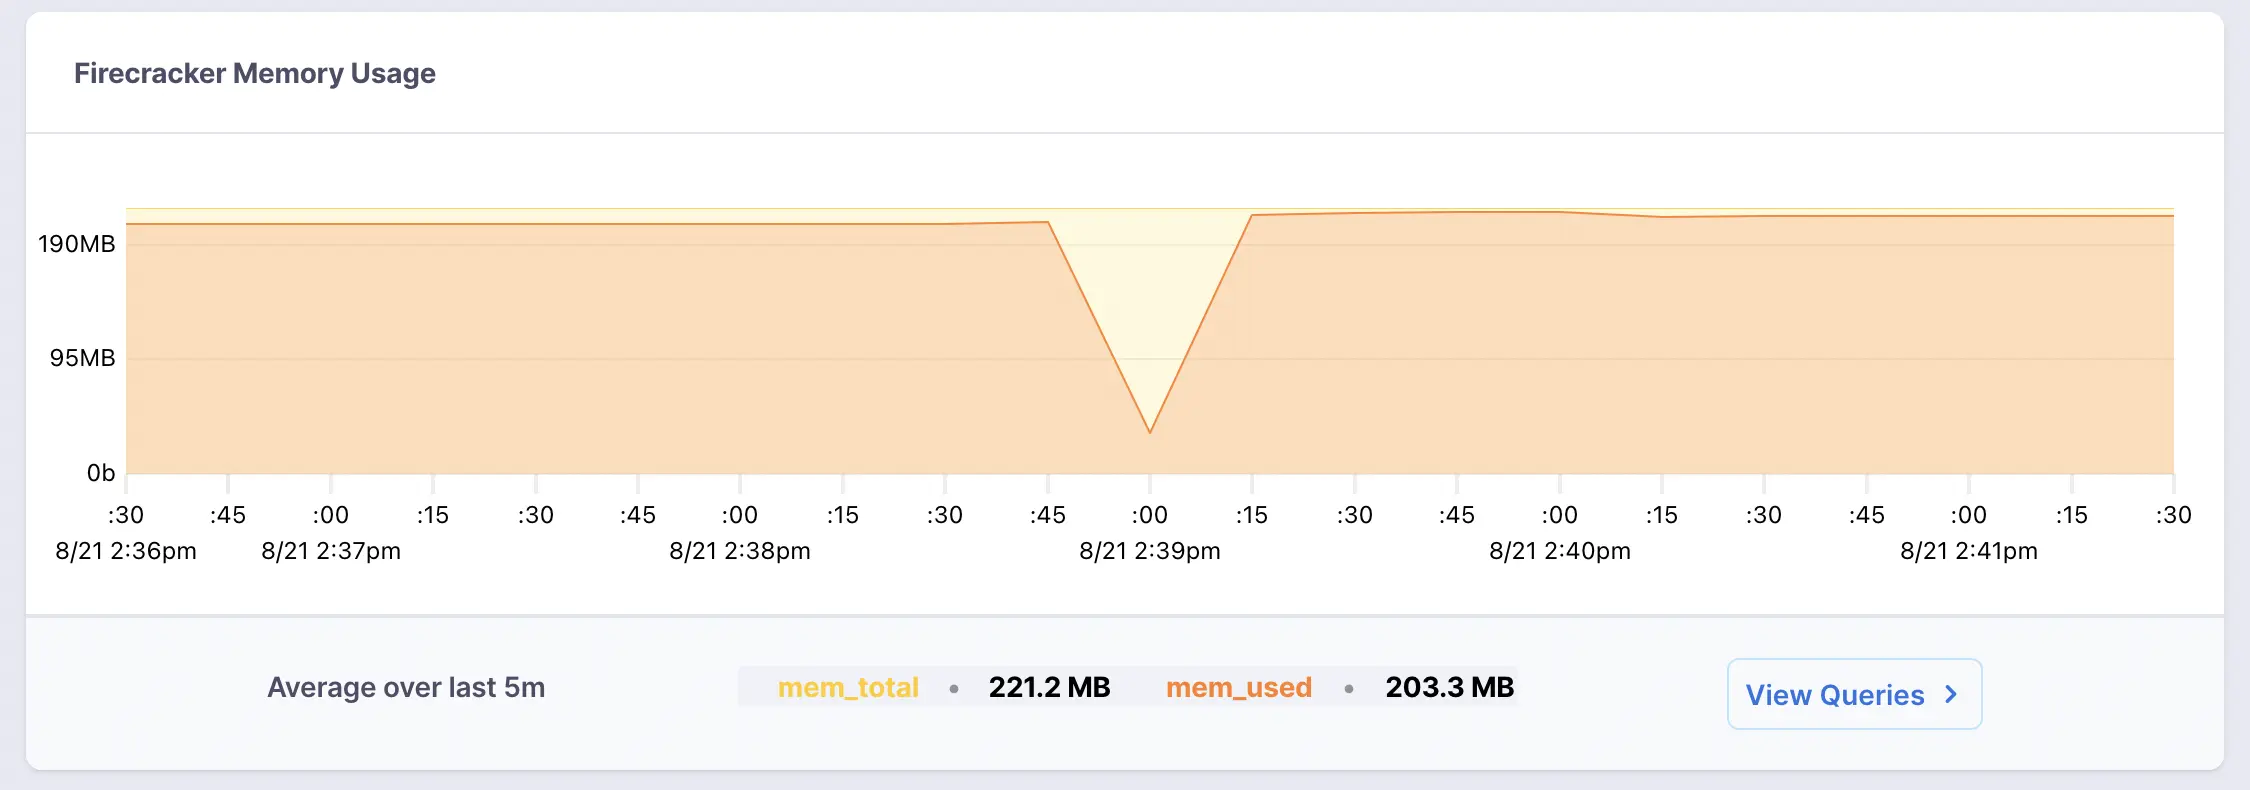
Fly.io memory dashboard
That doesn't look so great. It seems like Gitea idles just under the amount of memory we have with a default instance size, and operations like git push can bump it over the threshold to an out-of-memory error. Let's check out the "Scale" section of the dashboard, and increase the memory allotment for this VM:
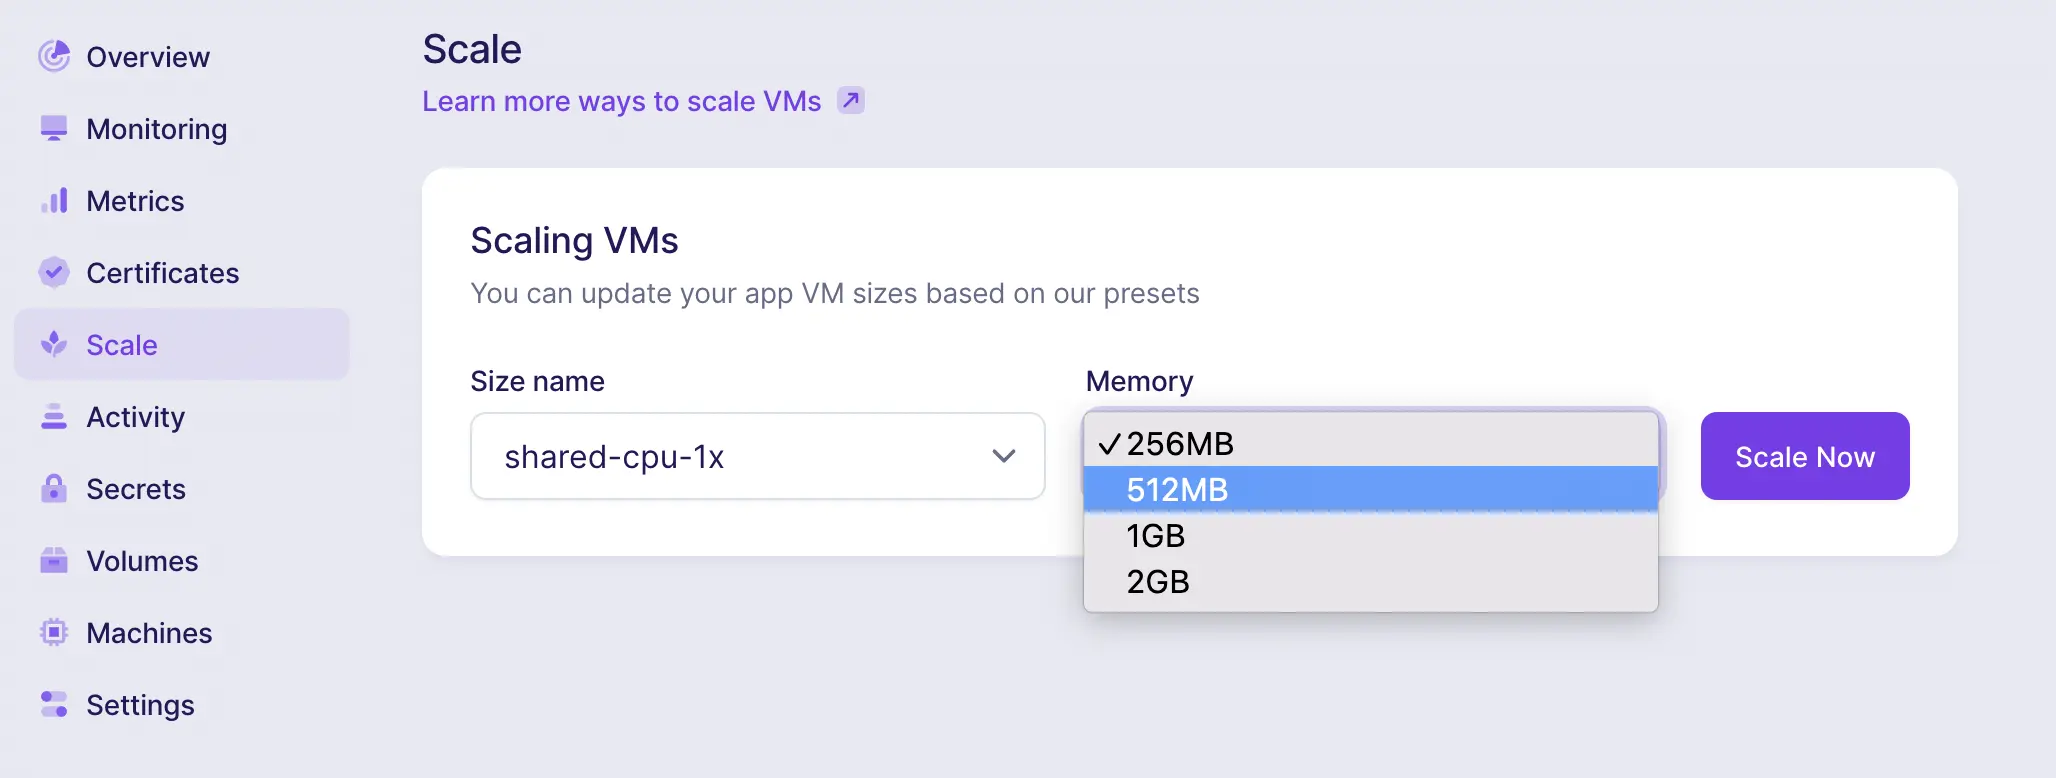
Fly.io VM scaling interface
You can also use flyctl to scale your app!
flyctl scale memory 512
I have been running my Gitea install on a 512MB instance since the first day I started using it, which seems to be plenty of headroom for personal use. If you open up your Gitea installation to the public and it starts to get popular, you might end up needing to scale up further.
It's worth noting that scaling up to 512 MB means you will start accruing a Fly.io balance, but so far this has never been more than a $2 monthly bill for me. If that's too steep for you, consider that Fly.io doesn't (at the time of this writing) charge for monthly bills below $5, or else check out some of the competing PaaS options out there.